
Jupyter AI
Jupyter AI, an integrated AI assistant, is available in the bwJupyter - Jupyter AI profile and can be used to support code development. The profile is based on the official Jupyter profile Datascience. Therefore, common packages for Python, Julia and R are already pre-installed.
Documentation for students
In the following sections, we will show you how to configure and use the AI Assistant.
Start profile
Your lecturer will either provide you with a link to an already prepared profile. In this case, you can start configuring your AI assistant straight away (see the following section).
If you have not received such a link, you can select and start the profile bwJupyter - Jupyter AI on the start page under bwJupyter profiles. Here too, you will then need to configure the AI assistant before you can use it.
Configuring the AI assistant
Once the profile has been started, a new message icon appears in the left-hand sidebar. The chatbot can be used there and the underlying Large Language Model (LLM) can be configured.

When using the AI assistant for the first time, you must specify the LLMs that will process your requests. To use the AI assistant, LLMs for "Completion model" and "Embedding model" must be specified. A specification for "Inline completions model" only needs to be made if AI-supported code completion is to be used. The configuration is saved across all profiles so that the models ideally only need to be configured once.
When selecting a model, you will receive a list of numerous providers. You cannot simply select and use the models. Almost all providers ask for an API key so that the use of the models can be assigned and billed accordingly. As there is currently no state service that provides LLMs, all universities and users must arrange for appropriate access.
If you only want to test the AI assistant with a few queries, you can select one of the models "bwJupyter (KI-Toolbox @ KIT, demo only) :: [Model]". These models are provided by the KIT as a demo version free of charge as part of the KI-Toolbox. No separate API key is required for these LLMs. Please note that the use of the AI Toolbox models is limited. If you encounter the error "429 Rate limit reached", the quota has already been used. You can try again after one hour. The full version is available to users within the KIT without limitation.
Below we will show you how you can integrate models from various other providers. These providers include, for example, the following:
- The GWDG provides access to LLMs on request as part of its AI Services. The request provides you with the model ID and an API key that you need to use the model in bwJupyter. You can find a list of all available LLMs and their capabilities as well as more information on making a request in the GWDG documentation.
- Some universities operate OpenWebUI. OpenWebUI provides a web interface similar to ChatGPT. Administrators can store several LLMs, which can then be addressed via the chat. To be able to use the models via OpenWebUI in bwJupyter, you need an API key and the model ID. The API key can be generated via "Settings >> Account >> API key". The model ID is displayed when you select a model by dragging the cursor over it.
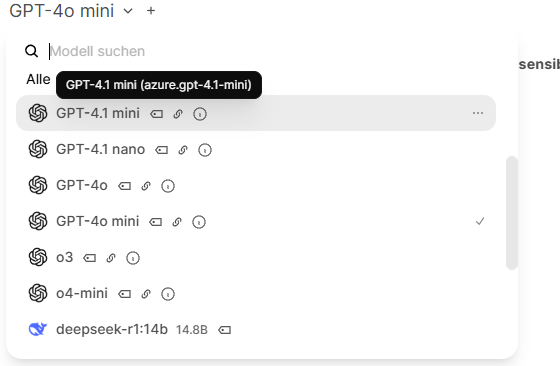
The model ID is displayed in brackets after the model.
In bwJupyter, the API key and model ID for a model (here, for example, "OpenAI (general interface) :: *") can be entered as follows:

The API key must be entered under "API Keys".
If you have access to LLMs but do not know how to integrate the models into bwJupyter, please send us a short email to support∂bwjupyter.de.
Using the AI Assistant
The AI Assistant provides support in three different ways: a chat user interface, AI Magic Commands and AI-powered inline completion.
Chat user interface
Natural language requests can be made to the generative AI in the chat via the chat user interface. It opens after selecting the speech bubble icon on the left-hand side of the screen. The request to the AI assistant is entered in the chat window.
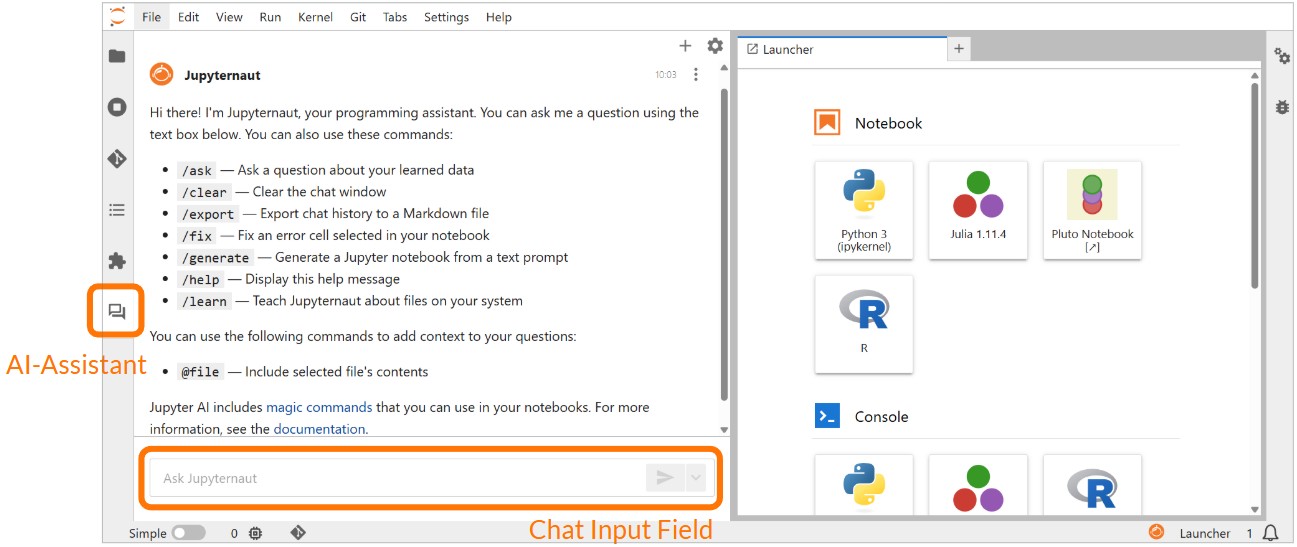
The natural language requests can be specified with the following commands:
- /ask (Ask a question about learned data)
- /clear (clear chat window)
- /export (export chat history)
- /fix (fix an error in a selected cell of the notebook)
- /generate (generate a Jupyter notebook)
- /help (Display help)
- /learn (Read local data - the file path must be specified here)
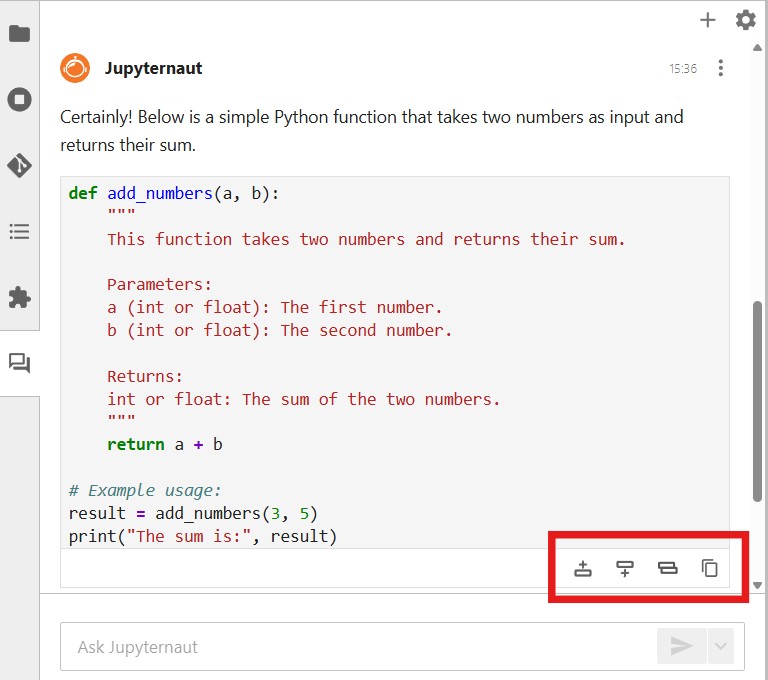
Code output by the AI assistant can be inserted directly into an open Jupyter notebook using the symbols at the bottom right of the output code cell. By clicking on the respective symbol, the code cell can be inserted either above, below or as a replacement for the currently selected notebook cell or alternatively copied to the clipboard.
You can also make direct inquiries about the code of a selected cell. To do this, right-click on the relevant cell to open the context menu and select "Generative AI". Various options are available to you there: You can have the code explained(Explain code), have errors corrected(Fix code), optimize the code(Optimize code) or restructure it(Refactor code). The modified code then appears in the chat interface.
AI Magic Commands
The AI assistant can also be used directly in the Jupyter Notebook via so-called AI Magic Commands within the Python code. This allows the desired AI model to be selected in the code and queries to be sent to it. The answers appear as output after executing the respective code cell.
Inline completion
The third component of the AI assistant is AI-supported code completion. To activate this, first select the "Enable completions by Jupyternaut" option via the button with the Jupyternaut symbol (![]() ) at the bottom right of the screen. Then define an "Inline Completions Model" in the settings of the AI wizard. You can find out how to select this in the "Configuring the AI assistant" section.
) at the bottom right of the screen. Then define an "Inline Completions Model" in the settings of the AI wizard. You can find out how to select this in the "Configuring the AI assistant" section.
Documentation for lecturers
In the following section, we will show you how to activate the integrated AI assistant for a profile. For the configuration and use of the AI assistant, please refer to the previous introduction for students.
Activate feature
To create a personalized profile with an integrated AI assistant, the JupyterLab environment "bwJupyter - JupyterAI" must be selected when creating the new profile. You must then select an AI model in this profile to configure the AI assistant. However, this selection is not applied to the students who use the profile. Each student must make this selection themselves before using the AI assistant for the first time.
You can also find information on how to use the AI assistant in a video recording of the AI assistant training course and the associated training slides.