Creating a Profile
After successfully logging in via bwIDM (see above), you will see a list of the standard profiles offered and the profiles you have already visited on the start page in the hub.
To create a new profile, navigate to"Service" → "Profile Management" in the main menu and click on the "+" card in the list of profiles.
There is no limit to the number of profiles you can create. A profile can refer to one course unit, several course units or an entire course.
Naming the Profile
Choose a unique profile name for your course unit or course and avoid generic names in order to minimize overlapping in the student profile overview.
Examples of acceptable profile names:
- Data Science (WS 25/26) - Exercise sheet 1
- Data Science (WS 25/26) - Exercise
- Data Science (WS 25/26)
Examples of unacceptable profile names:
- Data Science Environment
- Exercise sheet 1
- Differential equations
Select Advanced Features
When creating a profile, the following advanced features can be selected:
- Shared Directories (see also "Create Submission and Correction Folders")
- Submissions (see also "Create Submission and Correction Folders" and "Comprehensive grading system with automatic correction (grader service)")
- Real-Time Collabortaion (RTC) in Groups (see also "Collaborative work")
GPU Requirement
To include a GPU at infrastructure level in your Jupyter profile, activate the GPU required checkbox. This option does not yet guarantee you any libraries, program codes or programming languages with which you can address the GPU. These must be provided or subsequently installed via a suitable selection of the Jupyter environment.
Jupyter environment (Docker image)
The Jupyter environment or Docker image is an essential component of a profile that contains pre-installed packages, programming languages (Jupyter kernel), libraries, etc.
With the"Select from existing profile" option, you can choose from the bwJupyter images and Jupyter standard images we offer.
With the"Provide a custom docker image" option, you can refer to any publicly available Jupyter images, such as quay.io/jupyter/pyspark-notebook, or build and deploy your own Docker image.
This allows you to build on existing standard images, provision your own Docker images via container registry (e.g. GitLab container registry) and refer to them. If necessary, find out from your university whether a suitable container registry is offered.
More information on building and deploying your own Docker images can be found under the tab “Build and deploy your own Docker images”.
An introduction to Docker images is given in the Docker documentation. If you do not have a container registry available, you can use the official Docker registry as described in the Docker documentation or the GitHub container registry.
Note: If you build your own Docker image, please note that the /home/jovyan/work folder will be overwritten with the user's personal directory after the container is started. If you want to share files with students, please use the shared folder __shared/.
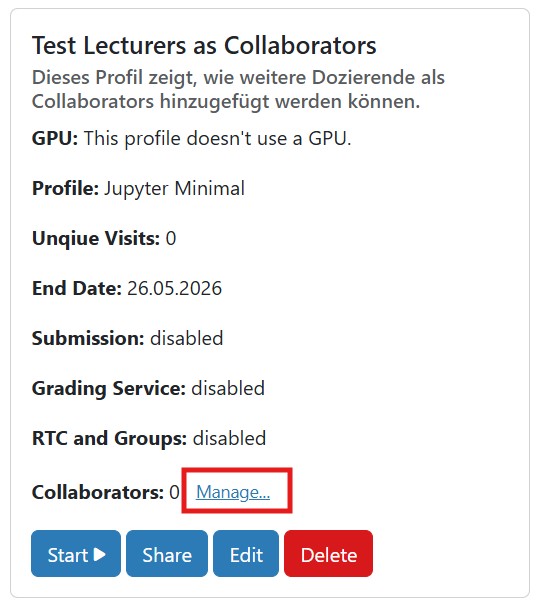
Add collaborators/lecturers
After creating a profile, additional collaborators (e.g., exercise leaders or other lecturers) can be added to the profile.
To do this, click on the “Manage...” link in the overview of the corresponding profile and add the collaborators to the profile using their respective JupyterHub usernames.